Before knowing about Dialog or Design Dialog. Let us understand about AEM Component. A component is a basic building block of a template.
Basic uses of Component is to hold, format, and render the content made available on your webpages. When authoring pages, the components allow the authors to edit and configure the content.
Content can be of two types:
1.Page Specific (in this case component dialog is used)
2.Design/Global(in this case design dialog is used)
If we talk about (Page Specific or component dialog) the question can you think of component without dialog can you reuse your component without dialog?
so, the answer is No, without component dialog AEM component is just a piece of code which you cannot reuse on multiple pages so it is most important part of component.
How to create component dialog?
Before create component dialog let us know about sling super type and sling resource super type property. These property play important role in AEM.
so, we create a node and the structure of node is:
1.Foundation
2.Coral Foundation
Nowadays, both are working but as of now we use coral foundation
Role of Load Dialog Specific ClientLibs
Whatever, the script you will be writing if you are writing script in jQuery, JavaScript inside a client Library that's the only standard way to write.
this is the additional property called extra Client Libs and we will add this as a dialog. In this case if we load client library in this way this client library will load only for the dialog and when the dialog is open.To show you dialog I created the component
First let's see the dialog so if I open I added there is a dialog open here.
Here is one drop-down, in grey screen these are container than first Name and Last name hold Textfields. Now we see node structure how to created this dialog and sling resource type.
Now, we see node structure how to created this dialog and sling resource super type.
- Login to CRXDE.
- Go to /apps/<project-name>/<path to component> [For Ex:- /apps/training/components/structure/trainingPage ]
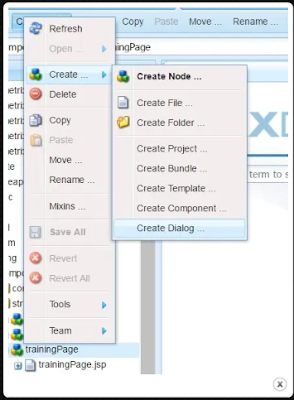
- Right Click on your component and select –> Create –> Create Dialog
- Rename Label from dialog to design_dialog . [Note:- Label should be design_dialog only]
- Expand the design_dialog node
- Rename Label from dialog to design_dialog . [Note:- Label should be design_dialog only]
- Expand the design_dialog node.
- Expand design_dialog node and select Tab 1 node.(I will describe what is the use of which node and why we have created)
- Right click on Tab 1 node. From menu select Create –> Create Node
- Name:- items (Name of node should be items only. Its is mandatory)
- Type:- cq:WidgetCollection
- Name:- customTitle (It is adviced to have name in lower case)
- Type:- cq:Widget
Add below jcr properties to customTitle node.- Name:- name Type:- String Value:- ./title
- Name:- xtype Type:- String Value:- textfield
- Name:- fieldLabel Type:- String Value:- Enter Title
- Now if we have a look on our design dialog, it should look like below:-
Now lets see how content authors can make use of this design dialog and author it on page.
- Go to site admin.
- Open your existing page or create a new page.
- From side kick navigate to design mode.

- Now Lets add selection drop down field to this dialog
- Select widget collection node(items) above full name. Right click and Create Node.
- Name: country_list (Name of the Node/Widget)
- Type: cq:Widget (It can be any type of widget depending upon which xtype we will use)
- Save All.
- Add xtype = selection in order to behave this node as selection node.Note:- Selection xtype have further sub-types like select (dropdown), combobox (select plus free text entry), checkboxes and radio buttons.
- Add type : select for creating a dropdown.
- Add fieldLabel : This will be displayed as a label before the field.
- Add name : This(./country) should be unique name to get user value from dialog to jsp. All fields in a component should have a unique value of name property.
Now lets create the dropdown options.
- Select country_list node, right click and Create Node
- Name: options
- Type: cq:WidgetCollection (It will hold option list)
- Save All.
- Select options node, right click and Create Node
- Name: v1
- type: cq:Widget
- Save All.
- Select v1 node and
- Add text – India (This text will be displayed in dropdown to users)
- Add value – india(this is the value that is stored at jcr node)
- Repeat above process 2 more times and create node v2 and v3.


No comments:
Post a Comment