Friday, 24 May 2024

Workflow part-2(Custom Workflow Process and Custom Workflow Step )

Process step is allow us to execute ECMAScript or OSGI service.

  • Implement WorkflowProcess interface and override execute() method to create custom workflow process. Refer this URL to read more about workflow, model and its steps.
Follow below syntax to implement workflow process .


  • WorkItem: This contains workflow data as shown below.
  • WorkflowSession: It provides the complete capability to manage workflow models and instances. Workflow session allows us to provide complete on workflow model, items, active items, workflows(running, abort, completed).
  • MetaDataMap: It provide access to data map and arguments passed as an input.Process Step Implementation.
Process Step Implementation
  • Follow below step to create process and consume as part of workflow process.
1. Create a Java class. Implement WorkflowProcess interface and override execute method.


2. Create workflow model and process step to consume above created custom process step. Open URL and click on Models tile for navigating to Models section.


3. Click on Create button to create a brand new model.


4. Provide Title for workflow model and click on Done button.


5. Select newly created workflow model as click on Edit button to add workflow steps.

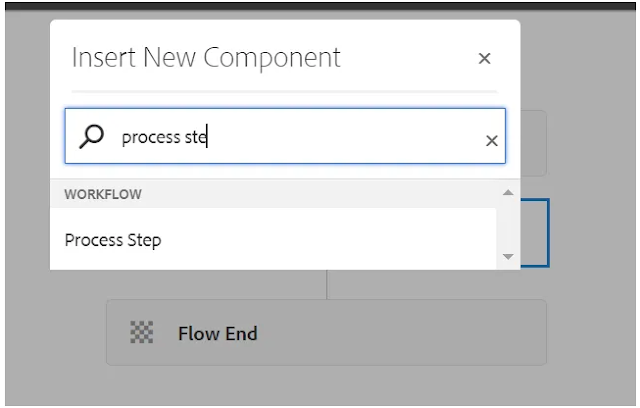
6. Click on Drag components here parsys to drag and drop step.
7. Select Process Step option.


8. Configure Process Step and provide above create custom step as part of step1.

9. Click on Sync will pick latest configurations from workflow model while execution.

10. Open any page to Start Workflow as shown below.


11. Select workflow created earlier as shown below and click on Start Workflow to start workflow execution.


12. It will call execute() method from CustomProcess.java class as soon as click on Start Workflow button.


14.In the repository, added pages have properties 'approval 1' and 'approval 2'.
Custom Workflow Step with dialog in aem


  • A custom workflow process is a backend module that can be individually deployed to AEM. Once you deploy this custom workflow process in AEM. it will be available inside a process step dropdown.
  • It does not have its own dialog. If you need to pass some values to this, you must use the existing dialog of the process step.
  • This is not applicable on the workflow model page.
  • If you want to create a custom workflow step, you need a component (only a dialog) and an editConfig node.
  • A custom workflow process is an individual module that does not need a custom workflow step to work; it can be deployed individually to AEM.
  • A custom workflow step needs a process and a custom workflow process


1.Go to Tools -> Workflow -> Models. Open Workflow Models.


2.create Custom Workflow step 


3.After created dialog

4.Set the path in open properties
5. 
Configure the Custom Workflow Step to add our Custom Step.


6. After authoring the Custom Workflow Step.
7. We found our dialog, which we created for the customized workflow component.

8.
Once done with configuring, Click on Sync at the top rightmost corner of the       screen to propagate the changes at Runtime.

    
9. Write a custom workflow process


10.
Your workflow is created. You can try running it.
11. 
In the Logger, print FirstName, LastName, and title.


12.You can see that your custom workflow process step is working properly, which is         why it shows in the archive.


Hope You can complete or step back the workflow step to take the necessary actions.

Thanks for reading
Matri Sharma


Quotes of the day
Just one small positive thought in the morning can change your whole day.


Wednesday, 8 May 2024

Workflow in AEM (Part -1)

 What is Workflow?

  • It allows you to automate your tasks, which can be individual tasks or a series of tasks performed sequentially, mainly on content, such as pages and assets.
  • When you create a Workflow, the first thing you need is a Workflow Model. The Workflow Model is the heart of the workflow, as it contains a series of steps. Each step can perform a specific task, providing complete functionality. You can reuse these steps in any workflow.
  • There are 'n' number of steps available out of the box in AEM. However, you can also create your own steps.


When you create a Workflow Model, it is stored in two places in the repository.
  • Model Design [/conf/global/setting/workflow/model]
  • Runtime Model [/var/workflow/models]
When we talk about steps, for example, step 1, step 2, up to step 'n', there are four types.

  • Container Step: When we want to trigger another model or workflow, for example, when we want to execute or trigger a child workflow, we use a Container Step. 
  • Participant Step: When we require human interaction within a workflow, such as assigning tasks to someone, we use a participant step.
  • Decision Step: When you need to perform a task based on a condition, typically when branching is required in your workflow, you use a decision step.
  • There are two types of decision steps:
  1. AND
  2. OR
  • Process Step: Custom workflow processes are implemented using the process step.
After creating a workflow model, it can be invoked in three main ways.

  1. Launcher
  2. API/Code
  3. Manually
  • Launcher:- When we want to automate the triggering of a workflow, we create a Launcher.
  • API/code:-When we want to trigger this workflow using code, we can do so in any backend module, such as a servlet or Sling model. This can be achieved using API/Code.
  • Manually:- In AEM, we have a console where we can trigger this workflow manually.
How do you write a Workflow Model?


  • Models: All the Out of the Box models will be present under models, and you can create your own model.
  • Instances: All the running instances of that workflow will be present under 'instances.
  • Launchers: All the Out Of the Box launchers will be present under 'launchers', and you can create your own launcher as well.
  • Archive:- All the successful workflow instances will be present under Archive.
  • Failures:- In case your workflow fails due to any reason, the instances of failed workflows will be present under 'Failures'.
Step1:


Step 2:


Step 3:


Step 4:


Step 5:


Step 6:


Step 7:

Manually Trigger Workflow


Step 8:


How to trigger a workflow through the Launcher

Step 1:

After create Workflow


Step 2:


Step 3:


Step 4:


How to trigger a workflow through the API/Code


  • For triggering a workflow via API in the backend, first, you need a WorkflowSession.
  • Once you have the WorkflowSession, you then need a WorkflowModel. You need the WorkflowModel when you are using the WorkflowSession to pass the exact path in your Runtime model, which you can then trigger.
  • After that, you need WorkflowData, which you use with the WorkflowSession, essentially using the payload of your workflow.
  • Once you have both the WorkflowModel and WorkflowData, you can start the workflow by using the WorkflowSession and passing both the WorkflowModel and WorkflowData.

We are using a servlet as a backend module to trigger the workflow using API/code.

Step1:


Step 2:


Step 3:

In error.logs


Step 4:


Quotes
Success is the sum of small efforts - repeated day in and day out.

Thanks for Reading
Matri Sharma

Tuesday, 30 April 2024

OSGI Factory Configuration

  • OSGI Factory Configuration

When you want to create more than One instance of any OSGI Configuration in that case you will create OSGI Factory Configuration.

for eg:-


  • How to make a OSGI Configuration as a OSGI Factory Configuration?

@Designate(ocd=Configuration name.class, factory=true)

  • we add factory=true parameter 

How to write OSGI Factory Configuration? 

  • Step 1: We can keep our configuration in a separate file
for example: com.adobe.aem.assets.asics.core.config


Step 2: write OSGI service Interface


Step 3: write OSGI service class


What is the meaning of 


  • Inside the @Reference annotation, we can define which service to inject using the OSGi filter configuration.
  • In OSGi, the cardinality of a reference is defined by the cardinality attribute of the @Reference annotation. It determines how many service instances can be bound to a component and how the component behaves when services become available or are withdrawn.
  • Without Multiple (Default Single Cardinality):

    If the cardinality is not specified or set to single, the component will bind to the first available service instance. Once bound, the component will not listen for additional service instances.

    With Multiple Cardinality:

    If the cardinality is set to Multiple, the component will listen for and bind to each service instance that becomes available. The binding method will execute every time a new service instance is created.

  • POLICY DYNAMIC:
  • If the policy is set to Static, OSGi will not dynamically manage the binding and unbinding of services. In this case, it will not automatically consider the unbind method.
  • If the policy is set to Dynamic, it means that the component can dynamically bind and unbind services. When your method is volatile and the policy is dynamic, OSGi will automatically find and use the unbind method, based on its name, to handle the unbinding of services.
How Bind and Unbind Work

  • Whenever a service is bound, the bind method is called. At bind time, if the configuration is created or available, it binds with the service. The first time, it creates a list, and each subsequent time, it adds the configuration to that list. Every time this method executes, it keeps adding to this list.
  • Every time a configuration is removed, the unbind method is triggered and removes that configuration from the list. Suppose you add a configuration; the bind method will execute and add the configuration to the list. If you remove that configuration, the unbind method will execute and remove the configuration from the list.
Step 4: Write Sling Model Interface


Step 5: call in sightly


Step 6: To Adding Configuration in Factory Configuration


How to view configuration on page


Thanks for Reading
Matri Sharma

Quotes 
"It takes courage to grow up and become who you really are." — 

Extending AEM Components Using sling:resourceSuperType — Powered by Sling Resource Merger

Quote's of the day "You never fail until you stop trying" What is Sling Resource Merger ?   Sling Resource Merger is the hidd...